Basic XIST concepts
This document explains parsing/generating XML files, XML transformations via XIST classes and other basic concepts.
XIST is an extensible HTML/XML generator written in Python. It was developed as a replacement for an HTML preprocessor named HSC and borrows some features and ideas from it. It also borrows the basic ideas (XML/HTML elements as Python objects) from HTMLgen or HyperText.
(If you’re impatient, there’s also a list of examples that shows what can be done with XIST.)
Overview
XIST can be used as a compiler that reads an input XML file and generates a transformed output file, or it could be used for generating XML dynamically inside a web server (but note that handling object trees is slower than simply sending string fragments). In either case generating the final HTML or XML output requires the following three steps:
Generating a source XML tree: This can be done either by parsing an XML file, or by directly constructing the tree — as HTMLgen and HyperText do — as a tree of Python objects. XIST provides a very natural and pythonic API for that.
Converting the source tree into a target tree: This target tree can be a HTML tree or a SVG tree or XSL-FO tree or any other XML tree you like. Every node class provides a
convert()method for performing this conversion. For your own XML element types you have to define your own element classes and implement an appropriateconvert()method. This is possible for processing instructions and entity references too.Publishing the target tree: For generating the final output a
Publisherobject is used that generates the encoded byte string fragments that can be written to an output stream (or yielded from a WSGI application, etc.).
Constructing XML trees
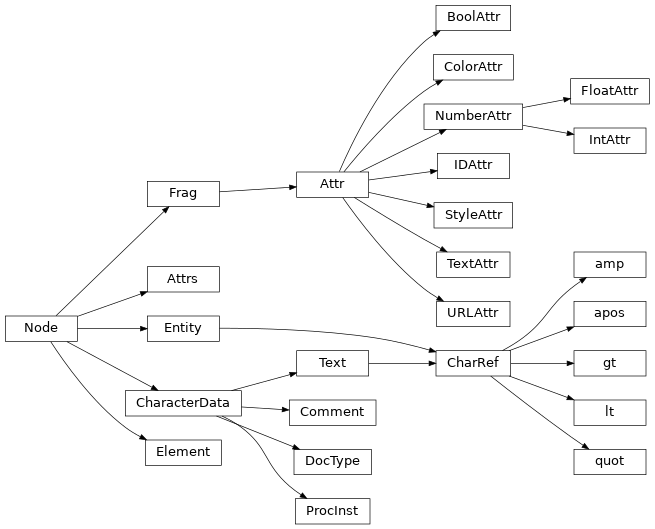
Like any other XML tree API, XIST provides the usual classes:
ll.xist.xsc.Elementfor XML elements;ll.xist.xsc.Attrfor attributes;ll.xist.xsc.Attrsfor attribute mappings;ll.xist.xsc.Textfor text data;ll.xist.xsc.Fragfor document fragments, (aFragobject is simply a list of nodes);ll.xist.xsc.Commentfor XML comments (e.g.<!-- the comment -->);ll.xist.xsc.ProcInstfor processing instructions (e.g.<?php echo $spam;?>);ll.xist.xsc.Entityfor entity references (e.g.&parrot;) andll.xist.xsc.DocTypefor document type declarations (e.g.<!DOCTYPE html PUBLIC ...>).
Creating plain elements, processing instructions and entities
Creating elements
Creating an element can be done with the function ll.xist.xsc.element().
Its signature looks like this:
xsc.element(xmlns, xmlname, *content, **attrs)
xmlns is the namespace name (e.g. "http://www.w3.org/1999/xhtml"
for HTML), and xmlname is the name of the element. Additional positional
arguments (i.e. items in content) will be the child nodes of the
element node. Keyword arguments will be attributes. You can pass most of
Python’s builtin types to element(). Strings and integers
will be automatically converted to Text objects.
Constructing an HTML element works like this:
from ll.xist import xsc

html_xmlns = "http://www.w3.org/1999/xhtml"

node = xsc.element(
   html_xmlns,
   "div",
   "Hello ",
   xsc.element(
      html_xmlns,
      "a",
      "Python",
      href="http://www.python.org/"
   ),
   " world!"
)
To output this element again, the method bytes() can
be used:
>>> node.bytes()
b'<div>Hello <a href="http://www.python.org/">Python</a> world!</div>'
If you want a namespace declaration you can use the prefixdefault
argument:
>>> node.bytes(prefixdefault=None)
b'<div xmlns="http://www.w3.org/1999/xhtml">Hello <a href="http://www.python.org/">Python</a> world!</div>'
For attribute names that collide with Python keywords or are not legal
identifiers (most notably class in HTML) you can pass the attributes as a
dictionary to element():
Creating processsing instructions
Processing instructions can be created with the function
ll.xist.xsc.procinst(). Its signature looks like this:
xsc.procinst(xmlname, *content)
So to create and print a processsing instruction named code with the content
x = 42, you can do the following (the method string()
is similar to bytes(), but returns a str object
instead of a bytes object):
from ll.xist import xsc

node = xsc.procinst("code", "x = 42")
print(node.string())
This will output:
<?code x = 42?>
Creating entity references
Finally entity references can be created with the function
ll.xist.xsc.entity():
from ll.xist import xsc

node = xsc.entity("html")
print(node.string())
This will output:
&html;
Creating XML trees with with blocks
Furthermore it’s possible to use with blocks to construct XIST trees.
Inside a with block the unary + operator or the
add() function can be used to add nodes or attributes to the
current level of the tree:
with blocksfrom ll.xist import xsc
html_xmlns = "http://www.w3.org/1999/xhtml"
with xsc.build():
with xsc.element(html_xmlns, "div", {"class": "quote"}) as node:
with xsc.element(html_xmlns, "h1", "Confucius (551-479 BC)"):
xsc.add({"class": "author"})
with xsc.element(html_xmlns, "ol"):
+xsc.element(html_xmlns, "li", "I hear and I forget.")
+xsc.element(html_xmlns, "li", "I see and I believe.")
+xsc.element(html_xmlns, "li", "I do and I understand.")
ll.xist.xsc.build must be used as the top level with block, so that
XIST knows what to do with the nodes inside the block.
Creating XML trees from XML files
XML trees can also be generated by parsing XML files. For this the module
ll.xist.parse provides several tools.
For example, parsing a string can be done like this:
from ll.xist import parse

node = parse.tree(
   b"<p xmlns='http://www.w3.org/1999/xhtml'>Hello <a href='http://www.python.org/'>Python</a> world!</p>",
   parse.Expat(ns=True),
   parse.Node()
)
For further info about the arguments to the parsing functions, see the
documentation for parse.
XML trees as Python objects
XIST works somewhat different from a normal DOM API. Instead of only one element
class, XIST has one class for every element type. All the elements from
different XML vocabularies known to XIST are defined in modules in the
ll.xist.ns subpackage. (Of course it’s possible to define additional
element classes for your own XML vocabulary). The definition of HTML can be
found in ll.xist.ns.html for example.
Every element class has a constructor of the form:
__init__(self, *content, **attrs)
Positional arguments (i.e. items in content) will be the child nodes of
the element node. Keyword arguments will be attributes. You can pass most of
Python’s builtin types to such a constructor. Strings and integers will be
automatically converted to Text objects.
Constructing an HTML element works like this:
from ll.xist.ns import html

node = html.div(
   "Hello ",
   html.a("Python", href="http://www.python.org/"),
   " world!"
)
For attribute names that collide with Python keywords or are not legal
identifiers (most notably class in HTML) the attribute name must be
slightly modified, so that it’s a legal Python identifier (for class an
underscore is appended):
(Don’t worry: This modified attribute name will be mapped to the real official attribute name once the output is generated.)
You can pass attributes as a dictionary too:
node = html.div(
   "Hello world!",
   dict(class_="greeting", id=42, title="Greet the world")
)
Furthermore it’s possible to use with blocks to construct XIST trees.
Inside a with block the unary + operator or the
ll.xist.xsc.add() function can be used to add nodes or attributes to the
current level of the tree:
with blockswith xsc.build():
with html.div(class_="quote") as node:
with html.h1("Confucius (551-479 BC)"):
xsc.add(class_="author")
with html.ol():
+html.li("I hear and I forget.")
+html.li("I see and I believe.")
+html.li("I do and I understand.")
ll.xist.xsc.build must be used as the top level with block, so that
XIST knows what to do with the nodes inside the block.
Generating XML trees from XML files
XML trees can also be generated by parsing XML files. For this the module
ll.xist.parse provides several tools.
For example, parsing a string can be done like this:
from ll.xist import parse
from ll.xist.ns import html

node = parse.tree(
   b"<p>Hello <a href='http://www.python.org/'>Python</a> world!</p>",
   parse.Expat(),
   parse.NS(html),
   parse.Node()
)
For further info about the arguments to the parsing functions, see the
documentation for parse.
Defining new elements and converting XML trees
To be able to parse an XML file, you have to provide an element class
for every element type that appears in the file. These classes either come from
modules provided by XIST or you can define your own. Defining your own
element class for an element named cool works like this:
class cool(xsc.Element):
   def convert(self, converter):
      node = html.b(self.content, " is cool!")
      return node.convert(converter)
You have to derive your new class from ll.xist.xsc.Element.
The name of the class will be the element name. For element type names that
are invalid Python identifiers, you can use the class attribute xmlname
in the element class to overwrite the element name.
To be able to convert an element of this type to a new XML tree (probably HTML
in most cases), you have to implement the convert()
method. In this method you can build a new XML tree from the content and
attributes of the object.
Using this new element is simple:
>>> node = cool("Python")
>>> print(node.conv().bytes())
b'<b>Python is cool!</b>'
conv() simply calls convert()
with a default converter argument. We’ll come to converters in a minute.
bytes() is a method that converts the node to a byte
string. This method will be explained when we discuss the publishing interface.
Note that it is vital for your own convert() methods
that you recursively call convert() on your own content,
because otherwise some unconverted nodes might remain in the tree. Let’s define
a new element:
class python(xsc.Element):
   def convert(self, converter):
      return html.a("Python", href="http://www.python.org/")
Now we can do the following:
>>> node = cool(python())
>>> print(node.conv().bytes())
b'<b><a href="http://www.python.org/">Python</a> is cool!</b>'
But if we forget to call convert() for our own content,
i.e. if the element cool was written like this:
class cool(xsc.Element):
   def convert(self, converter):
      return html.b(self.content, " is cool!")
we would get:
>>> node = cool(python())
>>> print(node.conv().bytes())
b'<b><python></python> is cool!</b>'
Furthermore convert() should never modify self,
because convert() might be called multiple times for the
same node.
Converters
conv() is a convenience method that creates a default
converter for you and calls convert(). This converter
is created once and is passed to all convert() calls.
It is used to store parameters for the conversion process and it allows
convert() methods to store additional information,
so that it is available elsewhere during the conversion process. You can also call
convert() yourself, which would look like this:
from ll.xist import xsc
from ll.xist.ns import html

node = cool(python())
node = node.convert(xsc.Converter())
You can pass the following arguments to the Converter
constructor:
rootroot(which defaults toNone) is the root URL for the conversion process. When you want to resolve a link in some of your ownconvert()methods, the URL must be interpreted relative to this root URL (You can usell.xist.xsc.URLAttr.forInput()for that).modemode(which defaults toNone) works the same way as modes in XSLT. You can use this for implementing different conversion modes.stagestage(which defaults to"deliver") allows you to implement multi stage conversion: Suppose that you want to deliver a dynamically constructed web page with XIST that contains results from a database query and the current time. The data in the database changes infrequently, so it doesn’t make sense to do the query on every request. The query is done every few minutes and the resulting HTML tree is stored in the servlet (using any of the available Python servlet technologies). For this conversion thestagewould be"cache"and your database XML element would do the query whenstage == "cache". Your time display element would do the conversion whenstage == "deliver"and simply returns itself whenstage == "cache", so it would still be part of the cached XML tree and would be converted to HTML on every request.targettarget(which defaults tohtml) specifies what the output should be. Values must be namespace modules (see below for an explanation of namespaces).langlang(which defaults toNone) is the language in which the result tree should be. This can be used in theconvert()method to implement different conversions for different languages, e.g.:class note(xsc.Element): def convert(self, converter): if converter.lang == "de": title = "Anmerkung" elif converter.lang == "en": title = "Note" else: title = "???" node = xsc.Frag( html.h1(title), html.div(self.content) ) return node.convert(converter)
Additional arguments are passed when a converter is created in the context of
a ll.make script.
Attributes
Setting and accessing the attributes of an element works either via a dictionary
interface or by accessing the XML attributes as Python attributes of the
elements attrs attribute:
>>> node = html.a("Python", href="http://www.python.org/")
>>> print(node.bytes())
b'<a href="http://www.python.org/">Python</a>'
>>> del node.attrs.href
>>> print(node.bytes())
b'<a>Python</a>'
>>> node.attrs["href"] = "http://www.python.org"
>>> print(node.bytes())
b'<a href="http://www.python.org/">Python</a>'
All attribute values are instances of subclasses of the class
ll.xist.xsc.Attr. Available subclasses are:
ll.xist.xsc.TextAttr, for normal text attributes;ll.xist.xsc.URLAttr, for attributes that are URLs;ll.xist.xsc.BoolAttr, for boolean attributes (for such an attribute only its presence is important, it’s value will always be the same as the attribute name when publishing);ll.xist.xsc.IntAttr, for integer attributes;ll.xist.xsc.ColorAttr, for color attributes (e.g.#fff).
IntAttr and ColorAttr mostly serve
as documentation of the attributes purpose. Both classes have no added
functionality.
Attr itself is derived from Frag so
it is possible to use all the sequence methods on an attribute.
Unset attributes will be treated like empty ones so the following is possible:
del node.attrs["spam"]
node.attrs["spam"].append("ham")
This also means that after the:
del node.attrs["spam"][:]
the attribute spam will be empty again and will be considered to be unset.
Such attributes will be skipped when publishing.
The main purpose of this is to allow you to construct values conditionally and then use those values as attribute values:
import random

if random.random() < 0.5:
   class_ = None
else:
   class_ = "foo"

node = html.div("foo", class_=class_)
In 50% of the cases the generated div element will not
have a class attribute.
Defining attributes
When you define a new element you have to specify the attributes allowed
for this element. For this use the class attribute Attrs (which must be
a class derived from ll.xist.xsc.Element.Attrs) and define the
attributes by deriving them from one of the existing attribute classes.
We could extend our example element in the following way:
class cool(xsc.Element):
   class Attrs(xsc.Element.Attrs):
      class adj(xsc.TextAttr): pass

   def convert(self, converter):
      node = xsc.Frag(self.content, " is")
      if "adj" in self.attrs:
         node.append(" ", html.em(self.attrs.adj))
      node.append(" cool!")
      return node.convert(converter)
and use it like this:
>>> node = cool(python(), adj="totally")
>>> node.conv().bytes()
<a href="http://www.python.org/">Python</a> is <em>totally</em> cool!
Default attributes
It is possible to define default values for attributes via the class attribute
default:
class cool(xsc.Element):
   class Attrs(xsc.Element.Attrs):
      class adj(xsc.TextAttr):
         default = "absolutely"

   def convert(self, converter):
      node = xsc.Frag(self.content, " is")
      if "adj" in self.attrs:
         node.append(" ", html.em(self.attrs.adj))
      node.append(" cool!")
      return node.convert(converter)
Now if we instantiate the class without specifying adj we’ll get the
default:
>>> node = cool(python())
>>> print(node.conv().bytes())
b'<a href="http://www.python.org/">Python</a> is <em>absolutely</em> cool!'
If we want a cool instance without an adj attribute, we can pass
None as the attribute value:
Allowed attribute values
It’s possible to specify that an attribute has a fixed set of allowed values.
This can be done with the class attribute values. We could extend our
example to look like this:
class cool(xsc.Element):
   class Attrs(xsc.Element.Attrs):
      class adj(xsc.TextAttr):
         default = "absolutely"
         values = ("absolutely", "totally", "very")

   def convert(self, converter):
      node = xsc.Frag(self.content, " is")
      if "adj" in self.attrs:
         node.append(" ", html.em(self.attrs.adj))
      node.append(" cool!")
      return node.convert(converter)
These values won’t be checked when we create our cool instance. Only
when this node is parsed from a file will the warning be issued. The warning
will also be issued if we publish such a node, but note that for warnings
Python’s warning framework is used, so the warning will be printed only once
(but of course you can change that with warnings.filterwarnings()):
>>> node = cool(python(), adj="pretty")
>>> print(node.bytes())
/Users/walter/checkouts/LivingLogic.Python.xist/src/ll/xist/xsc.py:2368: \
IllegalAttrValueWarning: Attribute value 'pretty' not allowed for __main__:cool.Attrs.adj
  warnings.warn(IllegalAttrValueWarning(self))
b'<cool adj="very"><python /></cool>'
Required attributes
Finally it’s possible to specify that an attribute is required. This again will
only be checked when parsing or publishing. To specify that an attribute is
required simply add the class attribute required with the value
True. The attribute alt of the class ll.xist.ns.html.img
is such an attribute, so we’ll get:
>>> from ll.xist.ns import html
>>> node = html.img(src="eggs.png")
>>> print(node.bytes())
/Users/walter/checkouts/LivingLogic.Python.xist/src/ll/xist/xsc.py:2770: \
RequiredAttrMissingWarning: Required attribute 'alt' missing in ll.xist.ns.html:img.Attrs.
  warnings.warn(errors.RequiredAttrMissingWarning(self, attrs.keys()))
<img src="eggs.png" />
Namespaces and pools
Now that you’ve defined your own elements, you have to tell the parser about
them, so they can be instantiated when a file is parsed. First you have to
assign an XML namespace to these classes. This is done by setting the class
attribute xmlns to the namespace name:
from ll.xist import xsc, parse
from ll.xist.ns import html

xmlns = "http://xmlns.example.org/foo"

class python(xsc.Element):
   xmlns = xmlns

   def convert(self, converter):
      return html.a("Python", href="http://www.python.org/")

class cool(xsc.Element):
   xmlns = xmlns

   def convert(self, converter):
      node = html.b(self.content, " is cool!")
      return node.convert(converter)
When parsing the parser fetches the classes it uses from a
ll.xist.xsc.Pool object. We can put our two classes into a pool like
this:
It’s also possible to register the element classes in a pool directly at
class construction time via a with block like this:
with blockfrom ll.xist import xsc, parse
from ll.xist.ns import html
with xsc.Pool() as pool:
xmlns = "http://xmlns.example.org/foo"
class python(xsc.Element):
xmlns = xmlns
def convert(self, converter):
return html.a("Python", href="http://www.python.org/")
class cool(xsc.Element):
xmlns = xmlns
def convert(self, converter):
node = html.b(self.content, " is cool!")
return node.convert(converter)
Now you can use this pool for parsing:
s = b'<cool xmlns="http://xmlns.example.org/foo"><python/></cool>'

node = parse.tree(s, parse.Expat(ns=True), pool)
It’s also possible to call the parsing function with a predefined mapping between namespace names and namespace prefixes:
s = b'<cool><python/></cool>'

node = parse.tree(
   s,
   parse.Expat(),
   parse.NS("http://xmlns.example.org/foo"),
   pool
)
If you have many elements, registering them in a pool becomes cumbersome. In this case you can put your element classes into a module and then register all elements in the module:
Global attributes
You can define global attributes belonging to a certain namespace by defining
a global Attrs class and giving each attribute a namespace name via
xmlns:
class Attrs(xsc.Attrs):
   class foo(xsc.TextAttr):
      xmlns = "http://www.example.com/foo"
To make this global attribute know to the parsing, you simply can put
the Attrs in the pool used for parsing.
Setting and accessing such an attribute can be done by using the attribute class instead of the attribute name like this:
>>> from ll.xist.ns import html
>>> node = html.div("foo", {Attrs.foo: "bar"})
>>> str(node[Attrs.foo])
'bar'
An alternate way of specifying a global attribute in a constructor looks like this:
>>> from ll.xist.ns import html
>>> node = html.div("foo", Attrs(foo="baz"))
>>> str(node[Attrs.foo])
'baz'
Entities
In the same way as defining new element types, you can define new entities.
The following example is from the module ll.xist.ns.abbr:
from ll.xist import xsc
from ll.xist.ns import html

class html(xsc.Entity):
   def convert(self, converter):
      return html.abbr(
         "HTML",
         title="Hypertext Markup Language",
         lang="en"
      )
You can use this entity in your XML files like this:
Processing instructions
Defining processing instructions works just like elements and entities. Derive a
new class from ll.xist.xsc.ProcInst and implement
convert(). The following example implements a
processing instruction that returns an uppercase version of its content as a
text node.
class upper(xsc.ProcInst):
   def convert(self, converter):
      return xsc.Text(self.content.upper())
It can be used in an XML file like this:
There are namespaces containing processing instruction classes that don’t
provide a convert() method. These processing instruction
objects will then be published as XML processing instructions. One example is
the namespace ll.xist.ns.php.
Other namespaces (like ll.xist.ns.jsp) contain processing instruction
classes, but they will be published in a different (not XML compatible) format.
For example ll.xist.ns.jsp.expression("foo") will be published as
<%= foo>.
Publishing XML trees
After creating the XML tree and converting the tree into its final output form,
you have to write the resulting tree to a file. This can be done with the
publishing API. Three methods that use the publishing API are
ll.xist.xsc.Node.iterbytes(), ll.xist.xsc.Node.bytes() and
ll.xist.xsc.Node.write(). ll.xist.xsc.Node.iterbytes()
is a generator that will yield the complete 8-bit XML string in fragments.
ll.xist.xsc.Node.bytes() returns the complete 8-bit XML string.
Writing a node to a file can be done with the method
ll.xist.xsc.Node.write():
>>> from ll.xist.ns import html
>>> node = html.div("äöü", html.br(), "ÄÖÜ")
>>> with open("foo.html", "wb") as f:
...   node.write(f, encoding="ascii")
...
All these methods use the method ll.xist.xsc.Node.publish() internally.
publish() gets passed an instance of
ll.xist.xsc.Publisher.
Specifying an encoding
You can specify the encoding with the parameter encoding (with the
encoding specified in an XML declaration being the default, if there is no such
declaration "utf-8" is used). Unencodable characters will be escaped with
character references when possible (i.e. inside text nodes, for comments or
processing instructions you’ll get an exception):
>>> from ll.xist import xsc
>>> from ll.xist.ns import html
>>> s = "A\xe4\u03a9\u8a9e"
>>> node = html.div(s)
>>> node.bytes(encoding="ascii")
b'<div>;AäΩ語</div>;'
>>> node.bytes(encoding="iso-8859-1")
b'<div>;A\xe4Ω語</div>;'
>>> xsc.Comment(s).bytes(encoding="ascii")
Traceback (most recent call last):
...
File "/Users/walter/.local/lib/python3.3/encodings/ascii.py", line 22, in encode
return codecs.ascii_encode(input, self.errors)[0]
UnicodeEncodeError: 'ascii' codec can't encode characters in position 1-3: ordinal not in range(128)
When you include an XML header or an
XML contenttype, XIST will automatically insert the
correct encoding when publishing:
>>> from ll.xist import xsc
>>> from ll.xist.ns import xml, meta
>>> e = xsc.Frag(xml.XML(), "\n", meta.contenttype())
>>> e.conv().bytes(encoding="iso-8859-15")
b'<?xml version="1.0" encoding="iso-8859-15"?>\n<meta http-equiv="Content-Type" content="text/html; charset=iso-8859-15" />'
HTML compatibility
Another useful parameter is xhtml, it specifies whether you want pure
HTML or XHTML as output:
xhtml==0This will give you pure HTML, i.e. no final
/for elements with an empty content model, so you’ll get e.g.<br>in the output. Elements that don’t have an empty content model, but are empty will be published with a start and end tag (i.e.<div></div>).xhtml==1This gives HTML compatible XHTML. Elements with an empty content model will be published like this:
<br />(This is the default).xhtml==2This gives full XML output. Every empty element will be published with an empty tag (without an additional space):
<br/>or<div/>.
Namespaces
By default XIST doesn’t output any namespace declarations. The simplest way to
change that, is to pass True for the prefixdefault argument when
publishing:
from ll.xist.ns import html

e = html.html(
   html.head(
      html.title("The page")
   ),
   html.body(
      html.h1("The header"),
      html.p("The content")
   )
)

print(e.bytes(prefixdefault=True))
Using True allows XIST to choose its own prefixes. The code above will
output (rewrapped for clarity):
<ns:html xmlns:ns="http://www.w3.org/1999/xhtml">
   <ns:head>
      <ns:title>The page</ns:title>
   </ns:head>
   <ns:body>
      <ns:h1>The header</ns:h1>
      <ns:p>The content</ns:p>
   </ns:body>
</ns:html>
You can also use a fixed prefix:
print(e.bytes(prefixdefault="h"))
This will output (again rewrapped):
<h:html xmlns:h="http://www.w3.org/1999/xhtml">
   <h:head>
      <h:title>The page</h:title>
   </h:head>
   <h:body>
      <h:h1>The header</h:h1>
      <h:p>The content</h:p>
   </h:body>
</h:html>
If you want the empty prefix you can use None:
print(e.bytes(prefixdefault=None))
This will output (again rewrapped):
<html xmlns="http://www.w3.org/1999/xhtml">
   <head>
      <title>The page</title>
   </head>
   <body>
      <h1>The header</h1>
      <p>The content</p>
   </body>
</html>
When elements from more than one namespace are present in the tree,
prefixdefault is unreliable. The first namespace encountered will get the
prefix specified by prefixdefault, all others will get a different prefix.
XIST will never use the same prefix for different namespaces.
XIST will also refuse to use an empty prefix for global attributes:
from ll.xist import xsc
from ll.xist.ns import html, xlink

with xsc.build():
   with html.html() as e:
      with html.head():
         +html.title("The page")
      with html.body():
         +html.h1("The header"),
         with html.p():
            +xsc.Text("The "),
            +html.a(
               "Python",
               xlink.Attrs(
                  href="http://www.python.org/",
                  title="Python",
                  type="simple"
               ),
               href="http://www.python.org/"
            )
            +xsc.Text(" homepage")

print(e.bytes(prefixdefault=None))
This will output:
<html xmlns="http://www.w3.org/1999/xhtml" xmlns:ns="http://www.w3.org/1999/xlink">
   <head>
      <title>The page</title>
   </head>
   <body>
      <h1>The header</h1>
      <p>The <a ns:href="http://www.python.org/" ns:type="simple" ns:title="Python" href="http://www.python.org/">Python</a> homepage</p>
   </body>
</html>
In the case of multiple namespaces you can use the prefixes argument to
specify an explicit prefix for each namespace. So we could change the publishing
statement from our example above to:
print(e.bytes(prefixes={"http://www.w3.org/1999/xhtml": None, "http://www.w3.org/1999/xlink": "xl"}))
which would give us the output:
<html xmlns="http://www.w3.org/1999/xhtml" xmlns:xl="http://www.w3.org/1999/xlink">
   <head>
      <title>The page</title>
   </head>
   <body>
      <h1>The header</h1>
      <p>The <a xl:href="http://www.python.org/" xl:type="simple" xl:title="Python" href="http://www.python.org/">Python</a> homepage</p>
   </body>
</html>
Note that we can shorten the publishing call from above to:
print(e.bytes(prefixes={html.xmlns: None, xlink.xmlns: "xl"}))
or even to:
print(e.bytes(prefixes={html: None, xlink: "xl"}))
Furthermore it’s possible to suppress output of namespace declarations for
certain namespaces by using the hidexmlns argument:
print(e.bytes(prefixes={html: None, xlink: "xl"}, hidexmlns=(html, xlink)))
This will output:
<html>
   <head>
      <title>The page</title>
   </head>
   <body>
      <h1>The header</h1>
      <p>The <a xl:href="http://www.python.org/" xl:type="simple" xl:title="Python" href="http://www.python.org/">Python</a> homepage</p>
   </body>
</html>
Finally it’s possible to force the output of namespace declarations for certain
namespaces (even if elements from those namespaces are not in the tree) by using
the showxmlns argument:
print(html.div().bytes(prefixes={html: None, xlink: "xl"}, showxmlns=(xlink,)))
This will output:
<div xmlns="http://www.w3.org/1999/xhtml" xmlns:xl="http://www.w3.org/1999/xlink"></div>